
THE TERAGAMES GUIDE FREE FIRE & TERABOX
From TeraBox to your next Free Fire top-up.
Create a file worth sharing. Understand eligible rewards. Buy diamonds only when you have a real budget.
In this guide 4 chapters
About the screenshots
Tap any screenshot to open it larger. TeraBox screenshots show its live web interface on 9 October 2026, with private account and payment details excluded. Garena checkout screenshots show the Singapore store on the same date. Your account and region determine available options.
Before you start
- A useful file you created and have permission to share.
- Your own TeraBox account and access to the current Webmaster rules if you want to participate.
- A payout method accepted by your account, if the program offers a withdrawal.
- For a later purchase: your Free Fire UID, the correct regional store and money already available to spend.
You can read every step here without submitting a UID or downloading the PDF. File sharing, reward approval, withdrawal and buying diamonds are separate actions.
Make something your squad can use
Choose a file you created and can legally share. A one-page aim routine could list your warm-up, practice duration and what to record after each session. A squad planner could include roles, session times and a match-review space. These are useful starting ideas, not promises of reward eligibility.
- STEP 01
Make a small file that solves a real problem
Start with something you created: a squad schedule, a practice checklist or a match-review worksheet. Pick one job for the file and make that job obvious on its first page. A useful aim routine, for example, can have a warm-up, a short practice session and a space to record what improved.
Export it as a PDF if the layout needs to stay consistent. Use a clear filename such as squad-practice-checklist.pdf. Open the finished file on your phone, check the text size and try any links. Remove personal details, account information and private conversations before sharing it.
Ready to continue: the file opens correctly, belongs to you and has a clear description.
- STEP 02
Sign in to your own TeraBox account
Open TeraBox from its official website or the app store for your device. Sign in with the account you want to use for your uploads. If you are new, review the service terms and complete its account setup first. You can follow this guide without entering a Free Fire UID on TERAGAMES.
Keep the original file on your device until you have checked the uploaded copy. Create a folder for your gaming resources so a later revision does not get mixed up with unrelated files. Choose only the files you intend to make available to other people.
Open the official TeraBox website (opens a new tab) - STEP 03
Upload the file and check the cloud copy
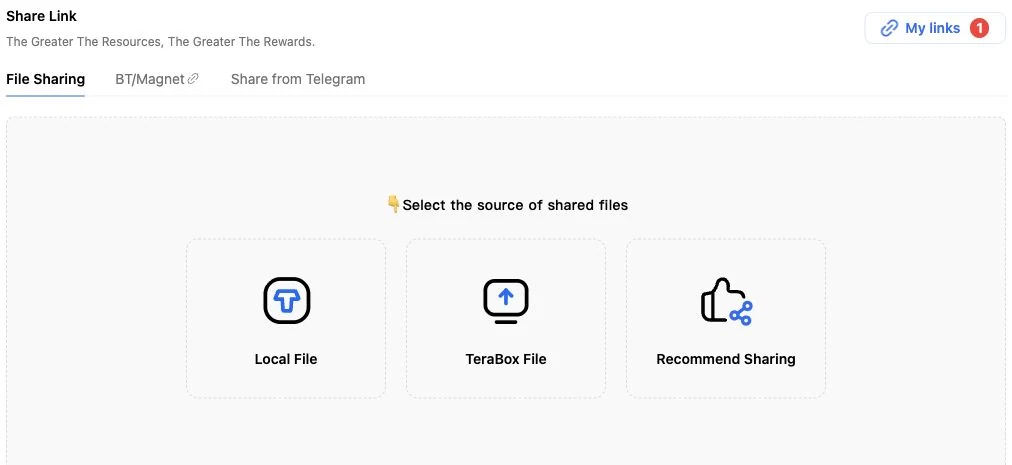
In the current web Webmaster Center, open Share → TeraBox Link and keep File Sharing selected. Choose Local File to pick the finished document from your device. If you already uploaded it to your cloud storage, choose TeraBox File instead. Recommend Sharing is a separate source of suggested resources.
Keep the upload page open until the transfer finishes. Check the filename, size and contents of the cloud copy before creating a link. An unfinished upload is not ready to share. If it fails, check your connection and available storage, then retry the transfer.
Ready to continue: you can open the completed file from your TeraBox account.
 Open larger screenshot
 The file-source choices in the live Webmaster Center, captured on 9 October 2026. Choose Local File for a file on your device or TeraBox File for an existing cloud copy.
Source: TeraBox: Share → TeraBox Link (opens a new tab)
Before upload: give the file a descriptive name, open it on your phone, check that every page works and remove private information from screenshots. Include a small preview so people can judge its value.
Check the available TeraBox reward plan
Visit the official Webmaster portal and review the terms and the plan offered to your account. Identify what activity qualifies, which countries or users are eligible, and what the dashboard actually measures. A normal download or a view is not automatically a paid referral.
- STEP 04
Check the available TeraBox reward plan
Open the official Webmaster portal while signed in. Read the plans available to your account, including qualifying activity, eligible countries and payout conditions. Select a program only after you understand its current rules. A normal file download does not automatically count as a paid referral.
If the program is unavailable to your account, stop the reward setup. You can still share a useful file, but do not plan a purchase around an unavailable reward.
Check your current Webmaster plans (opens a new tab)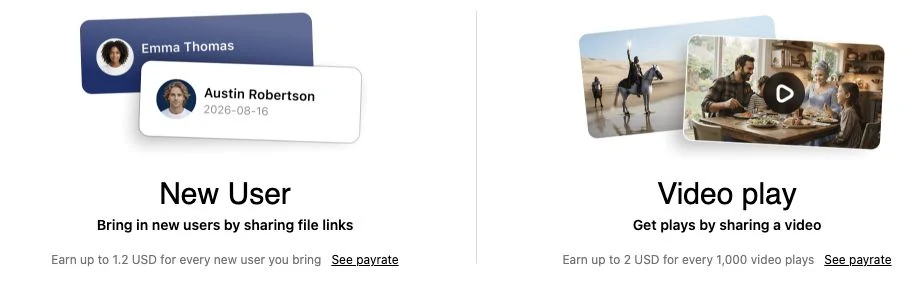 Open larger screenshot
 The live public program overview, captured on 9 October 2026. These advertised rates remain subject to your account’s eligibility and current program terms; they are not an earnings estimate.
Source: TeraBox Referral Program (opens a new tab) - STEP 05
Select the exact file in TeraBox File
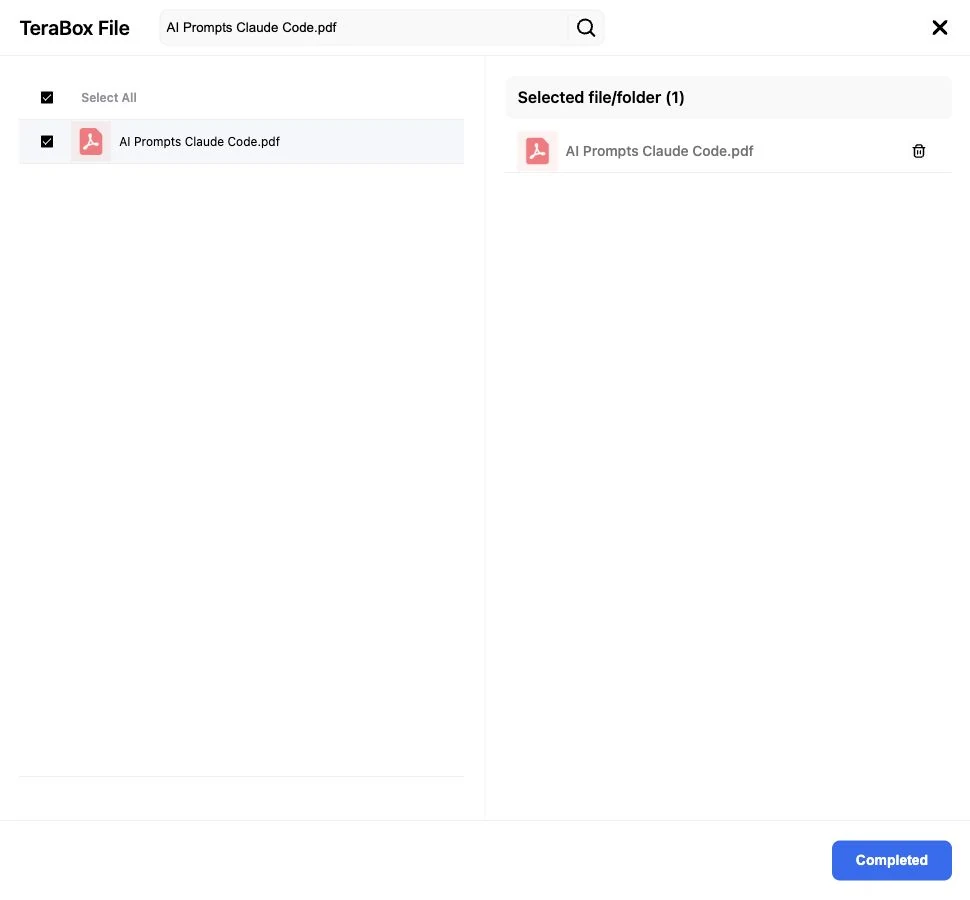
For a file already in your cloud storage, choose TeraBox File. Search for its filename, tick its checkbox and check the Selected file/folder panel on the right. Use Completed to return the selection to the link-creation screen.
Select only the document you intend to share: a folder can expose more files than a single-document link. The screenshot uses a public resource from TeraBox’s recommended collection as an example. For your own guide, select the file you checked in the previous chapter.
 Open larger screenshot
 The 2026 file picker with one public example selected. Check the right-hand selection, then use Completed. No new share link was generated for this capture.
Source: TeraBox: Share → TeraBox Link (opens a new tab) - STEP 06
Review the expiry and access settings
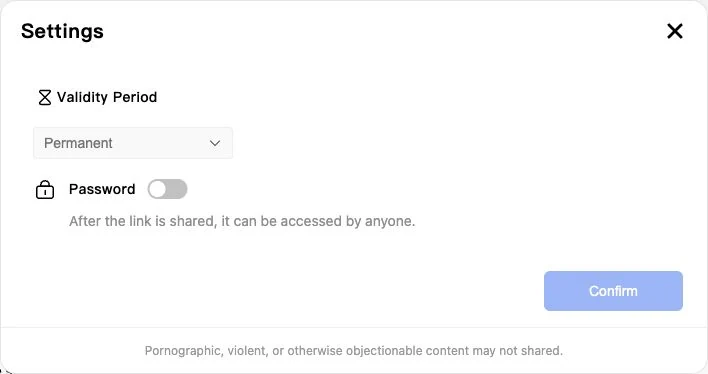
Back on the sharing screen, read Settings and choose Change to review the Validity Period and Password controls. Permanent is the expiry shown in this example; a password is off. Choose the access you actually intend and confirm your own settings when they are correct.
A public link can be accessed by anyone who receives it. If you protect yours with a password, give readers the access details they need. For a PDF, describe the destination as a PDF guide on TeraBox, without implying that opening it automatically awards game currency.
 Open larger screenshot
 The live expiry and password controls, captured on 9 October 2026. Review access before generating a link; these settings were not changed for the screenshot.
Source: TeraBox: Share → TeraBox Link (opens a new tab) - STEP 07
Generate the program link and keep a copy
For reward participation, follow the link-creation instructions inside Webmaster. With the correct file selected, review the offered domain and file type, then use Generate Link. All ages is the appropriate category for a general gaming checklist. Do not assume that every ordinary storage link has the same eligibility or tracking.
Keep the generated URL and any password together with the file’s description. My links lists existing links with their creation time and status; use the sharing action under Operation to retrieve a link. Successful in this table refers to link creation, not an approved reward or payout.
 Open larger screenshot
 My links in the live 2026 interface. This public example shows where to find a link’s status and sharing action. Successful does not mean a reward was approved.
Source: TeraBox: Share → TeraBox Link (opens a new tab) - STEP 08
Test the link before sharing it with your audience
Open the link in a private browser window to see what a reader encounters. Confirm the filename, preview, access code and any sign-in or app prompts. This check tells you whether the link works; it does not prove that a reward has been earned.
Share it where the community permits resource links, with a short description of what readers will get. A clear post could say: “My squad practice checklist — PDF on TeraBox. Qualifying activity may earn me a publisher reward.” Avoid repeated posts, misleading thumbnails and promises of a guaranteed return.
Ready to continue: a reader can identify the file and understand the destination and reward disclosure.
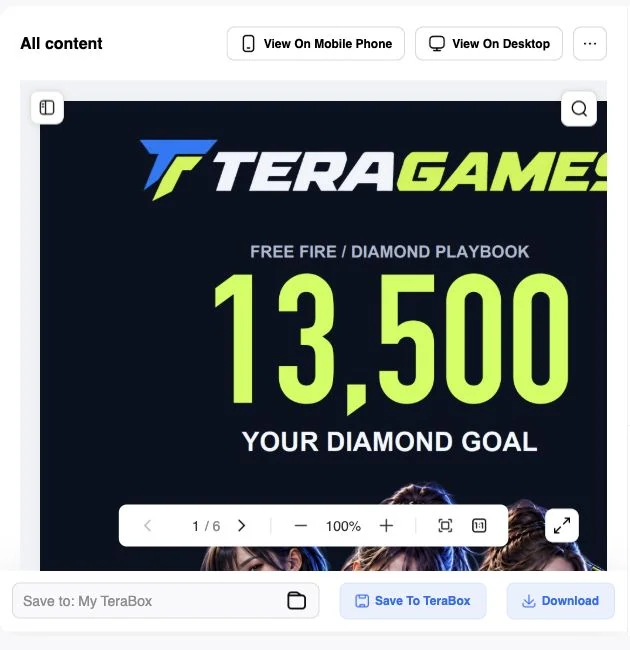 Open larger screenshot
 A reader’s view of the TERAGAMES PDF, captured on 9 October 2026. The page has separate Save to TeraBox and Download controls; a preview is not proof of a completed download or a diamond award.
Source: TERAGAMES PDF on TeraBox (opens a new tab) - STEP 09
Review sharing history and reward status
Open Reward Details from the sidebar. The current page separates the account balance from the Credited bonus record table. Use the Reward type filter to review the category you need; the table notes that only records from the last three months are displayed.
Keep clicks, qualifying activity and credited rewards separate, and read the portal’s update schedule before treating an unchanged balance as an error. Keep a private record of the file, link, date and status for support. A visit or download shown elsewhere is not proof of an approved payout.
 Open larger screenshot
 The live Reward Details table and filter, captured on 9 October 2026. This crop shows the controls; personal balances and transaction records are excluded.
Source: TeraBox: Reward Details (opens a new tab)
After uploading your permitted content, use the program sharing link supplied in your dashboard. Explain the file accurately. Post in communities that allow it and disclose that qualifying activity may earn you a reward. Avoid spam, misleading previews and repeated self-referrals.
Separate pending rewards from received money
Keep a simple record of the file, sharing date, qualifying activity and reward status. Check the current minimum withdrawal, payout method, processing details and fees in your account. TERAGAMES does not set these rules and cannot approve a payout.
- STEP 10
Review the withdrawal screen before requesting a payout
When the program allows a withdrawal, use Withdraw in the balance area on Home or Reward Details. Choose the payment platform offered to your account, then review the form. The current bank form asks for a withdrawal amount, nationality, payment method and bank, and shows a service fee and estimated receipt.
Read your account’s current minimum, supported countries, currency and processing rules. Complete any required verification only on the official service. Use your own bank or wallet and check the recipient, amount and charges before submitting your own request. Keep its reference, and leave unavailable or pending funds out of your top-up budget.
Ready to continue: your request has a record, and you understand its status and any charges.
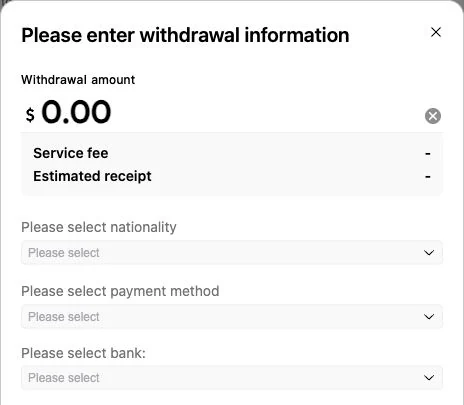 Open larger screenshot
 The actual withdrawal form, captured on 9 October 2026, with blank payment choices. Account identity and verification details are outside the crop. No payout was requested.
Source: TeraBox: Home → Withdraw (opens a new tab) - STEP 11
Wait for the money to arrive and set a spending limit
Check your own payout destination to confirm that the funds have actually arrived. Requested, processing or pending amounts are not yet money available to spend. Keep the payout record until the received amount is reconciled.
Set aside the money you need for other uses before choosing a diamond pack. If currencies differ, compare the amount you can actually spend after conversion and charges. A smaller purchase or no purchase is a valid outcome; the planner goal is not an obligation.
Ready to continue: the received funds cover your chosen spending limit without relying on a future reward.
Request a withdrawal only when the program permits it, and keep its transaction record. Wait until the money reaches your own payout method. Program availability and rates can change; unsuccessful or pending withdrawals cannot fund a purchase.
Buy the pack that fits your actual budget
Open Free Fire and copy the numeric UID from your player profile. Use the game’s purchase screen, or the official Garena checkout available in your region. Verify the account shown by the store, the pack and the total local-currency price before completing payment.
- STEP 12
Copy your numeric UID from Free Fire
Open Free Fire and tap your profile in the lobby. Find the numeric UID in the player profile and use its copy control when available. The Garena help image below shows both places: the lobby profile and the UID on the personal page.
Your UID is different from your nickname. Compare the copied digits with your profile before using them in a top-up form. The account in Garena’s reference image is a demonstration; do not copy its UID into your purchase.
Read the Free Fire UID guide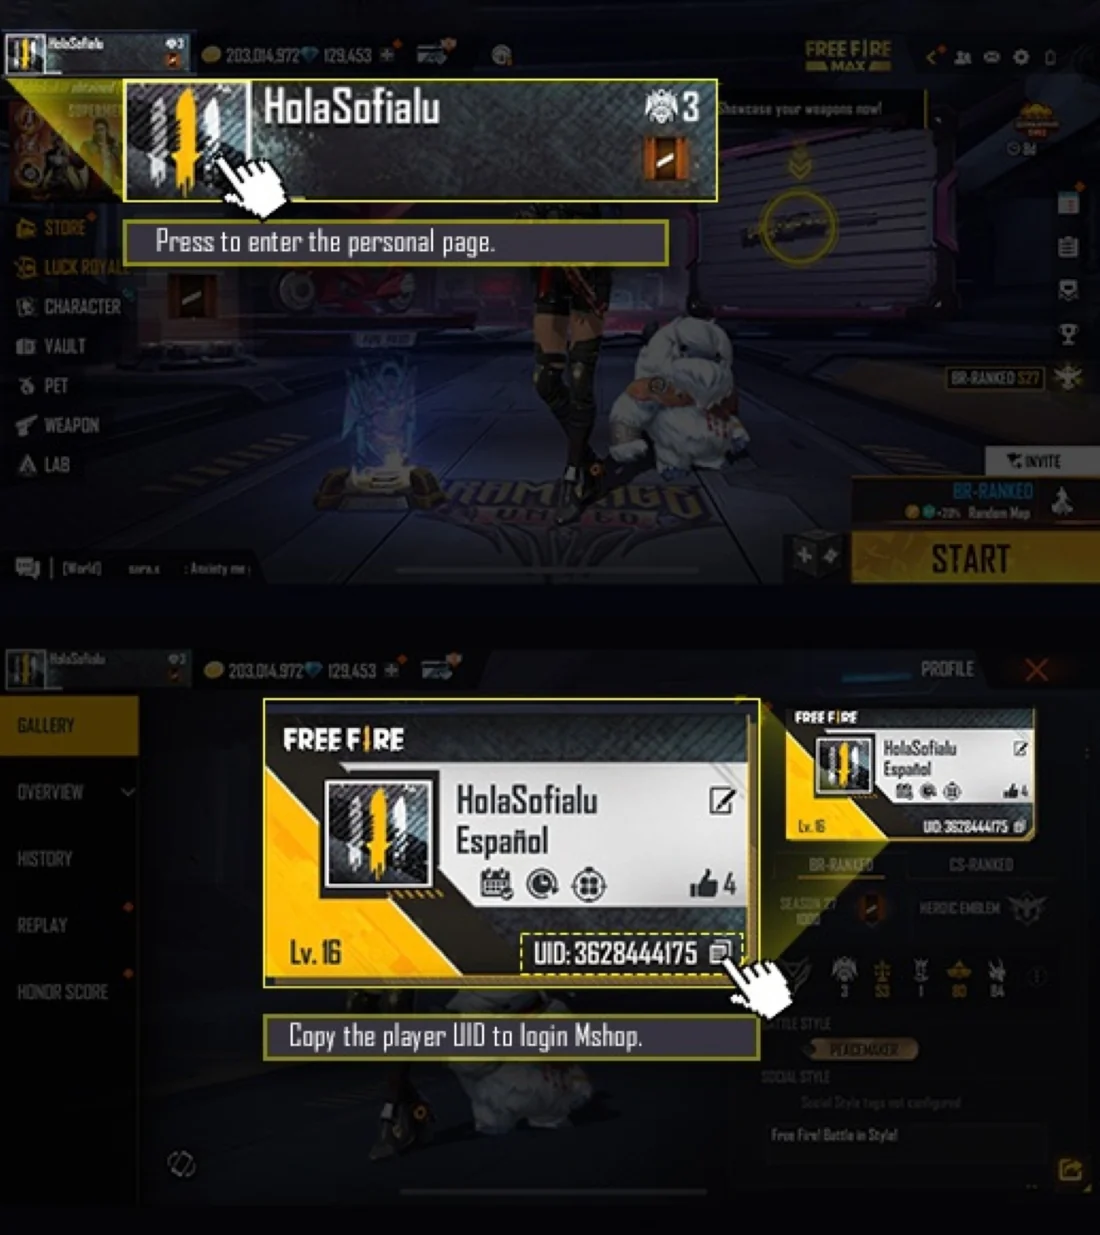 Open larger screenshot
 Official player-ID help image displayed by Garena Top Up Center. It uses a sample player profile; copy your own UID from the game.
Source: Garena Top Up Center, Singapore (opens a new tab) - STEP 13
Open the official purchase route for your region
Use the purchase screen inside your game, or Garena’s official regional Top Up Center where it supports your account. Check the game, region and currency before continuing. The screenshots here show Garena’s Singapore web store as an English example; its packs, prices and payment methods are not universal.
In a Player ID flow, enter your own numeric UID and use the store’s login or account-check action. If the store displays a nickname or account result, compare it with your profile. Correct the ID if it points to another player. For a game-account login, use only the provider’s official sign-in screen.
View the Singapore example on Garena (opens a new tab)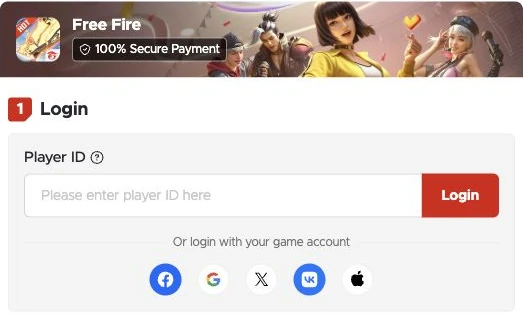 Open larger screenshot
 The real Player ID form, captured on 9 October 2026. No player account was entered for this screenshot.
Source: Garena Top Up Center, Singapore (opens a new tab) - STEP 14
Select a diamond pack within your budget
Choose a listed purchase pack and read what it contains. Distinguish a one-time diamond pack from a membership or other special deal. Check any stated conditions instead of treating every product as immediately available diamonds.
Compare the final cost with the limit you set. The screenshot shows a selected pack in a real store, while TERAGAMES’s planner amounts are goals. A goal such as 13,500 is not a store price, an available pack or a promise of delivery.
Ready to continue: you know the product type, diamond amount and maximum price you will accept.
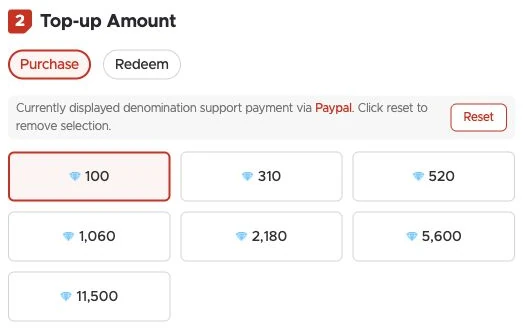 Open larger screenshot
 A selected 100-diamond pack in the Singapore example. Availability also depends on the chosen payment method; check your own store.
Source: Garena Top Up Center, Singapore (opens a new tab) - STEP 15
Review the payment method and complete your own checkout
Select a payment method supported by your store and account. Before pressing the purchase button, recheck the recipient, diamond amount, total, currency and any extra charges. The example below shows the store’s selected method and total before payment.
When everything is correct, follow the provider’s checkout and authorize the payment yourself. Keep any password or one-time code inside its official payment flow. If the page reports a pending result, check that transaction before trying again so you do not create a duplicate purchase.
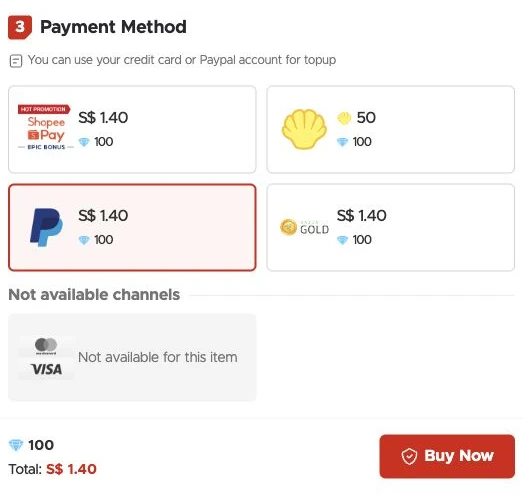 Open larger screenshot
 Real pre-payment review, captured on 9 October 2026. S$ is Singapore currency. No payment was made; this is not a receipt or proof of diamond delivery.
Source: Garena Top Up Center, Singapore (opens a new tab) - STEP 16
Save the receipt and verify the diamonds in the game
Keep the order reference, receipt, paid amount, time and payment status. Return to the same Free Fire account and check its diamond balance after the store indicates completion. Compare the purchase with the selected pack and any stated delivery conditions.
If the payment succeeded but the diamonds are missing, use the purchase provider’s help and your region’s Garena support. Give them the order details through their private support form. Do not post payment information publicly or immediately pay for the same pack again while its status is unresolved.
Finished: the purchase has a receipt, and you have checked the recipient account and diamond balance.
Find official Free Fire payment support (opens a new tab)
Use money already received after applicable fees, and allow for any store charges. TERAGAMES’s diamond choices are planning goals; they are not prices, store packs, orders or a promise that you will reach that amount. Save the receipt and use official support for payment or delivery issues.
Spend the money you have.
If you have received 10 in your local currency and want to keep 2 aside, your top-up budget is 8. Choose a store pack whose final price fits within 8, including any charges. The figures are only an arithmetic example.
Stuck on a step?
Start with the stage that failed. Keep the file link or private transaction reference so the right service can investigate.
The upload is missing or fails
Return to your file list and check whether the transfer completed. Check your connection, storage and source file. Open the cloud copy before creating or posting a link.
Readers cannot open the link
Check the exact URL, any access code and expiry. Try it while signed out to see the reader’s prompts. Explain any required sign-in clearly, and replace a broken link in the original post.
Views appear but rewards do not
Read the active program’s qualification rules and update schedule. Ordinary traffic and qualifying activity are different. Record the link and date, then contact TeraBox through its official help route if the record remains unclear.
A withdrawal is still pending
Check its status, recipient details and the processing information in your account. Keep the reference for support and leave the pending funds out of your purchase budget.
The store says the UID or region is wrong
Copy the UID again from your own profile and check the regional store. Stop if the account shown does not match. Do not choose an unrelated region simply to make a purchase button work.
Payment succeeded but diamonds are missing
Keep the receipt and order number, check the selected account and contact the purchase provider or Garena support. Resolve the existing payment status before deciding whether another purchase is needed.
Your final checklist
- The shared file and link match the description given to readers.
- Any reward is checked against your account’s active program rules.
- Only received funds are included in your spending limit.
- The purchase uses your own UID and a supported regional checkout.
- The receipt is saved, and the game’s balance has been checked.
Keep the playbook on your phone
The PDF covers file sharing, eligible rewards, payout basics and manual Free Fire top-up checks. Get it on TeraBox without entering a UID.
Download PDF via TeraBoxThe link opens TeraBox in a new tab. The publisher may earn a reward from qualifying activity. TeraBox's terms and privacy policy apply on its website.
Check the current official information
The live TeraBox pages and Garena store below are the sources for this walkthrough. TeraBox account pages require sign-in. Check your account and regional store for current eligibility, prices and payment options. External links open a new tab.
- TeraBox: Share → TeraBox Link (opens a new tab)Live web interface captured 9 October 2026
- TeraBox: Reward Details (opens a new tab)Live web interface captured 9 October 2026
- TeraBox: Home → Withdraw (opens a new tab)Live withdrawal form captured 9 October 2026
- TERAGAMES PDF on TeraBox (opens a new tab)Public reader view captured 9 October 2026
- TeraBox Referral Program (opens a new tab)Public program overview captured 9 October 2026 · Check your account for current rules
- Garena Top Up Center, Singapore (opens a new tab)Captured 9 October 2026 · Singapore example
- Garena Free Fire payment support (opens a new tab)
- Garena Free Fire official FAQ (opens a new tab)
TERAGAMES is an independent educational publisher. It does not operate either service, take top-up payments, verify your account or supply diamonds. No income, payout date or diamond amount is guaranteed.